Build a Full Stack Application with SAP CAP & Vue.js 3
Learn how to build a full stack application using SAP CAP as backend, Vue.js 3 for the frontend and deploy it manually.

I have to admit - SAP has never been my favorite tech company. For a long time, I associated them with bulky, overly complex, and somewhat outdated solutions that often felt unintuitive to developers like me. Obviously, that's a pretty simple opinion fueled by prejudice and misguided feelings of supremacy. But hey, we've all been there.

That's why I was pleasantly surprised when I stumbled upon SAP CAP (short for SAP Cloud Application Programming Model). It's an open-source development framework for building cloud services - and it's pretty cool. SAP CAP is very nice because it solves a lot of the usual questions in back-end development pretty much out-of-the-box:
- Conceptual Data Modeling: Support for features like temporal data types, localization, and user-managed data.
- Data Abstraction: A unified ORM with support for Postgres and HANA.
- Built-In Authentication & Authorization: No need to reinvent the wheel!
- Advanced Security: Native support for JWT, CORS, X-CSRF, and more.
- Local Development: Easily spin up locally cloned service instances.
- API Options: Choose between REST, OData, or GraphQL for exposing endpoints.
- OpenAPI Documentation: Publish OpenAPI docs and even convert them to TypeScript for your front-end (a big win!).
Here's the key takeaway: while SAP CAP integrates seamlessly within the SAP ecosystem, you're not locked in. The framework's flexibility is very nice, and having it released as an open-source piece that's backed and maintained by an enterprise-grade company is a huge plus.
So, let's dive right into the framework. And if you've made it this far, thanks for sticking around - I promise it gets better from here!
The first impression

As developers, we're no strangers to frameworks like LoopBack, Strapi, and PocketBase - tools designed to make back-end development faster and more efficient.
SAP CAP takes a similar approach to these frameworks but, in my opinion, does it better. One standout feature is its surprisingly active and robust community, which has contributed tons of cool add-ons and extensions. Think Websockets, GraphQL integration, Audit Logging, Change Tracking, Telemetry, and more.
Here's a taste of just some of the nice things the SAP CAP community brings to the table: CAP Plugins & Enhancements | capire
Quick Comparision
Where would journalistic objectivity be if we simply let my previous statements stand unchallenged? Right.
To provide a more balanced perspective, I've put together a quick comparison of several back-end frameworks. This should give you a brief idea of where SAP CAP stands in the landscape:
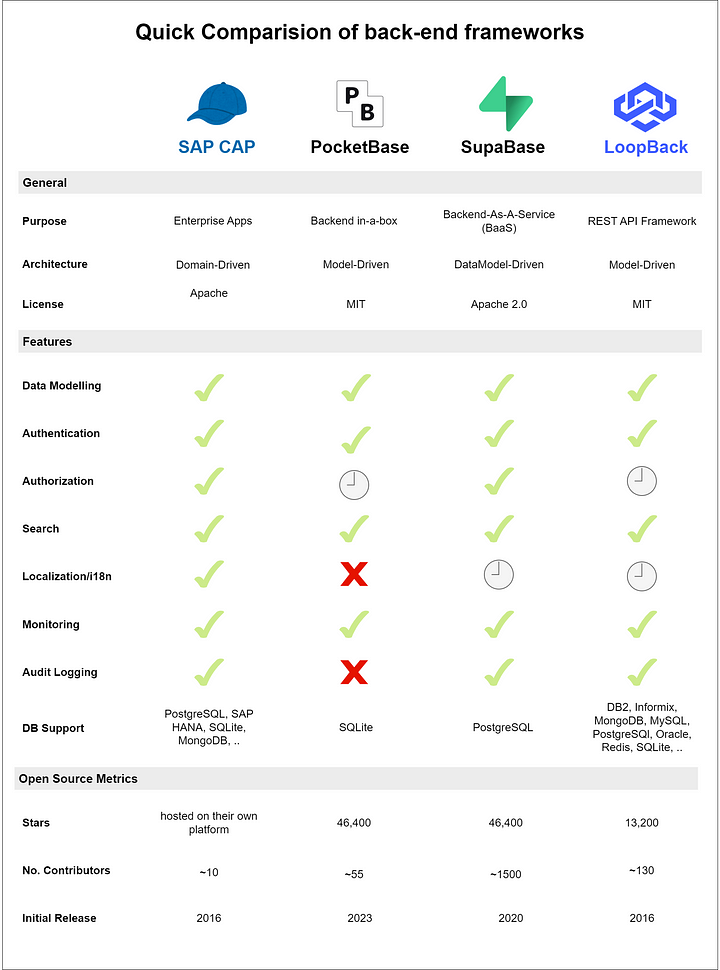
SAP CAP can be roughly compared to LoopBack (former IBM) both in scope and underlying business need. In general SAP CAP has a more modern, developer-friendly approach but comes with some drawbacks:
- It's not fully hosted on open platforms like GitHub or GitLab, which makes it harder to compare with other open-source projects.
- It personally feels more like a hybrid solution than true open source.
- There aren't a ton of external contributors, which kinda gives off the vibe that it's not drawing as much attention from the external community.
In my personal opinion, it would be awesome to see SAP open things up more in the future and really get the external community involved!
Understanding CAP - the basics
SAP CAP comes with a wide range of capabilities, covering aspects such as domain modeling, providing and consuming services, events & messaging, and much more.
At the time of writing, there are about 16 distinct aspects of SAP CAP, all thoroughly documented in The CAP Cookbook. But don't worry - you don't need to master all of them. As your project evolves and new requirements emerge, you'll naturally explore these aspects one by one. The iterative approach is one of the core values of SAP CAP.
For building an application that's split into a front-end (avoiding Fiori/UI5 for the front-end) and back-end, you only need to focus on three key aspects to get started:
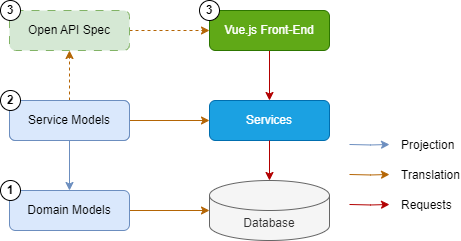
- 1 Domain Modeling
- 2 Providing Services
- 3 Consuming Services (Clients)
Before we start implementing (I know you're excited for the code), I will introduce you to the three aspects we are going to use today.
The aspects are already tailored towards our implemented use case: A simple catalog of cat breeds.
1. Domain Modeling
SAP CAP is designed in a way that makes you start out with domain modeling - which makes sense. To do this effectively, it's recommended to collaborate with business stakeholders or domain experts to design the model together. This is exactly what CDS (Core Data Services) is designed for - modeling data close to natural language, so stakeholders can be loosely involved with implementation.
SAP CAP encourages keeping models as flat as possible with minimal relationships, which brings us to a data structure like this, written in CDS:
namespace catcat.domain;

@description: 'Cat breeds with their properties'
entity CatBreeds {
  key name           : String @mandatory;
      originCountry  : String;
      coat           : String;
      pattern        : String;
}
As you see, modeling in CDS can be pretty straightforward. This section was just for the general concept. I will show the implementation later.
2. Providing Services
Once we've created a basic data model, the next step is to build services on top of it. These services are also modeled using CDS.
Let's say we create a service CatCatalog that returns an entity CatBreeds.
We create a very simple service definition followed by a projection onto the database entity. To add functionality, we added annotations for the route (@title), permissions (@requires), and some more. See the code below:
using catcat.domain as domainSchema from '../db/domainSchema';

@title: 'cat-catalog'
@Core.LongDescription: 'Provides all entities/services related to handling cat breeds.'
service CatCatalog{

  @readonly
  @description : 'Returns a list of all cat breeds'
  entity CatBreeds as projection on domainSchema.CatBreeds {
    *
  }

}
As you see, providing services in CDS can also be straightforward. This section is still just for the general concept. I will show the implementation later.
3. Consuming Services
With the previous two aspects we can create a very basic service - potentially up and running. To now consume this service, we have multiple approaches.
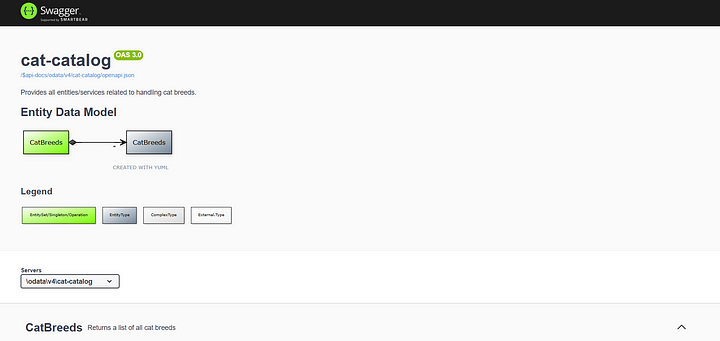
The most straightforward method is to use the Swagger integration that SAP CAP provides. With just a single npm install, we can generate an interactive API definition that looks like this:
Regarding integrating front-ends
The native approach for front-ends in SAP CAP is by leveraging the Fiori/UI5 framework. While this method is nice when staying within SAP's architecture, it can be limiting when development requires flexibility.
I personally prefer using MVVM front-end frameworks like Angular, React or Vue.js for faster, and more flexible development. With SAP CAP, generating an OpenAPI 3 definition is simple and requires just one command:
cds compile srv --service all -o docs --to openapi --openapi:diagram false
The definition can then be translated into a typescript definition to be used within any typescript-based front-end. Perfect! That's how you can use Angular, React or Vue.js.
That's all you need to know about the concepts involved. Let's do an actual implementation together.
Building our Application

Thank you for taking the time to go through the earlier section where we explored the fundamentals of SAP CAP. By now, you should have a solid understanding of the key components of this framework. Now, it's time to dive into the fun part: implementation.
Objective: We want to build a simple Cat Catalog service that serves Cat Breeds to a Vue.js front-end.
In this section, we'll build that application step by step using SAP CAP. Here's what's on the agenda:
- 1. Setting up - Project setup in VS Code
- 2. Building - back-end
- 3. Building - front-end
- 4. Completion - Seeing it in action!
- 5. Conclusion & Retrospective
1. Setting up - Project setup in VS Code
Make sure you have the prerequisites (NodeJS, VS Code) set up. More info: Getting Started | capire Install "@sap/cds-dk2" with command "npm add -g @sap/cds-dk" in your terminal. Create an empty folder for your project Open VS Code & open the folder Setup completed! 🥳
2. Building - back-end
The approach in SAP CAP is domain centric: That's why our implementation starts with data modeling in the back-end.
SAP CAP (Cloud Application Programming) and the CDS (Core Data Services) language are designed as modeling frameworks for less tech-savvy users. It allows domain experts to actively participate in the creation of the data model. By collaborating directly in CDS, you can simplify the process and eliminate redundant data modeling phases in external tools. This collaborative approach supports alignment but also saves time and resources.
1. Create a CAPService folder, like shown below:

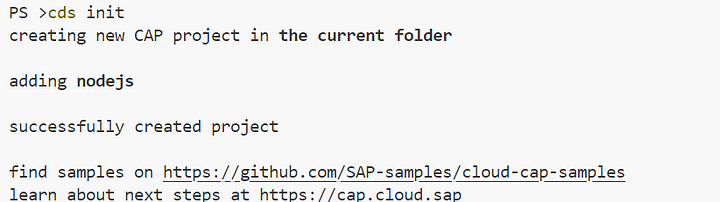
2. Navigate to CAPService folder and init the project with cds init:
cd .\CAPService\
cds init
4. Create your first schema file as domainSchema.cds in ./db/ folder:
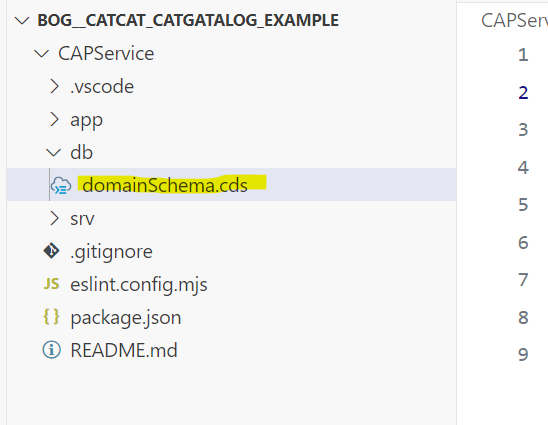
5. The contents of the DB model will be roughly translated to DB tables. For our service, create a model entity CatBreeds like this:
namespace catcat.domain;

@description: 'Cat breeds with their properties'
entity CatBreeds {
  key name           : String @mandatory;
      originCountry  : String;
      coat           : String;
      pattern        : String;
}
6. The DB model entities are private by default and are not being exposed. Exposing model entities is done through service definitions. For that, we need to create a new service cat-catalog.cds in ./srv/ folder:
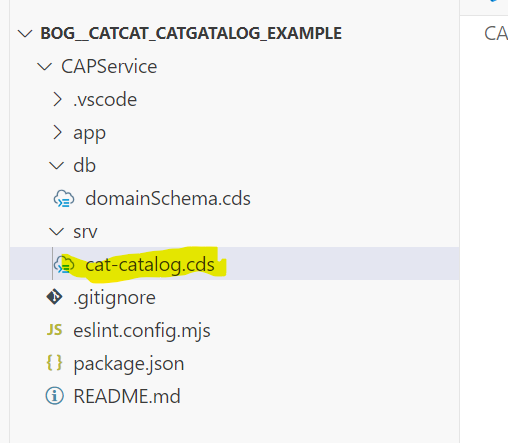
7. The definition for your service CatCatalog will look like this:
using catcat.domain as domainSchema from '../db/domainSchema';

@title: 'cat-catalog'
@Core.LongDescription: 'Provides all entities/services related to handling cat breeds.'
service CatCatalog{

  @readonly
  @description : 'Returns a list of all cat breeds'
  entity CatBreeds as projection on domainSchema.CatBreeds {
    *
  }

}
8. Already done! We can take a first glimpse at our created service using the command cds watch:
npm install
cds watch
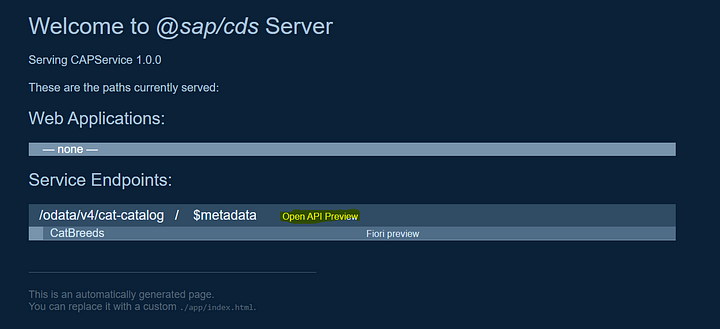
9. The command cds watch allows us to open the service in a debugging mode. It will look like this:
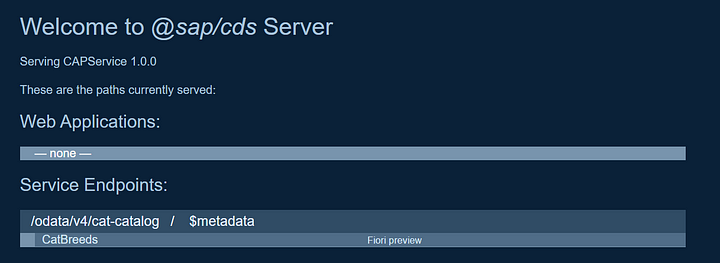
10. Awesome! Looks very nice. We have a cat-catalog service that exposes CatBreeds as an endpoint. Beautiful.
Adding Open API support
11. Now, let's try to interact with our service. For that, I recommend to add native Swagger UI support (cds-swagger-ui-express) with:
npm add --save-dev cds-swagger-ui-express
12. That's all. We now run cds watch again:
cds watch
13. Now, the previously shown UI loaded. As you see, we have a new button for Open API Preview:
14. After clicking, we are immediatelly greeted with a Swagger UI. We didn't need to set up anything. How nice!

Adding initialization data
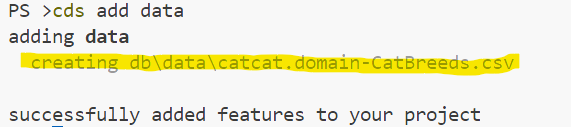
15. When you play around in Swagger UI, you will see that the CatBreeds service is empty. For that, we can add some initialization data with the command cds add data:
cds add data
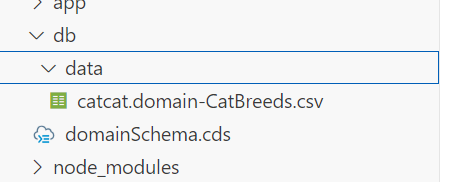
16. The command executed and generated a .csv file under .\db\data\\*.csv:
Thats how you can locate it in your explorer:
17. Now, we just need to add our data to the CSV. I asked AI to generate us 10 items for our data set. Use with caution - these might not be real CatBreeds:
name,originCountry,coat,pattern
Persian,Iran,Longhair,Solid
Siamese,Thailand,Shorthair,Pointed
Maine Coon,United States,Longhair,Tabby
Bengal,United States,Shorthair,Spotted
Sphynx,Canada,Hypoallergenic,None
Ragdoll,United States,Longhair,Pointed
Russian Blue,Russia,Shorthair,Solid
Abyssinian,Egypt,Shorthair,Ticked
Scottish Fold,Scotland,Shorthair,Solid
Norwegian Forest Cat,Norway,Longhair,Tabby
18. Save the *.csv-file and run cds watch again. Use Open API Preview and test the API again. You will now see that data is being returned:
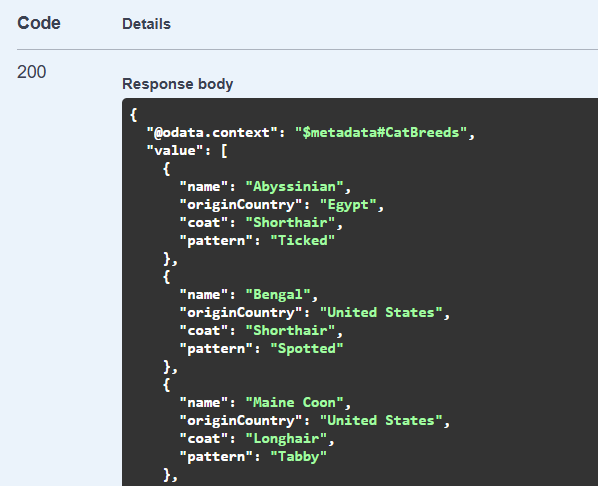
Our fully featured API is already working! Now it's time to move towards the connection of our front-end.
Adding the OpenAPI export
19. Let's create an OpenAPI export. I personally like to add it as a command within the CapService folder root through package.json. Modify yours with "genopenapi" like shown below:
{
  "name": "CAPService",
  "version": "1.0.0",
  "description": "A simple CAP project.",
  "repository": "<Add your repository here>",
  "license": "UNLICENSED",
  "private": true,
  "dependencies": {
    "@sap/cds": "^8",
    "express": "^4"
  },
  "devDependencies": {
    "@cap-js/cds-types": "^0.10.0",
    "@cap-js/sqlite": "^1",
    "cds-swagger-ui-express": "^0.10.0",
    "swagger-ui-express": "^5.0.1"
  },
  "scripts": {
    "start": "cds-serve",
    "genopenapi": "cds compile srv --service all -o docs --to openapi --openapi:diagram false"
  }
}
20. We now run the command to generate the service definition:
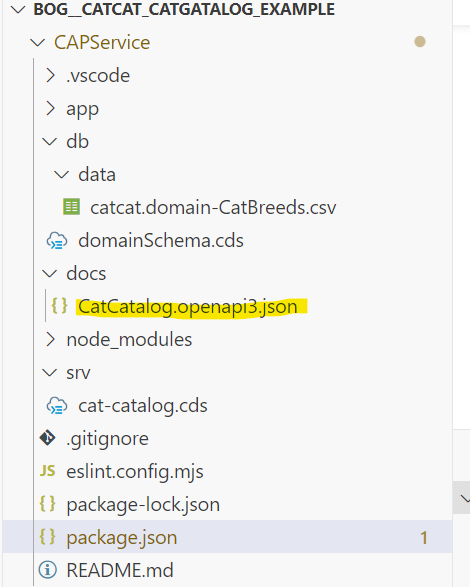
npm run genopenapi
As you can see, a new file of type .openapi3.json has been created in the ./docs/ folder. It contains the service definition:
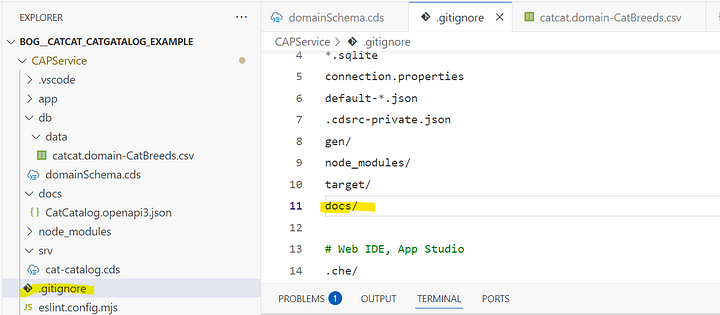
21. You see that a new folder has been added. We should add ./docs/ to .gitignore file to avoid using outdated api specs (personal recommendation)
Done! We can now relieable generate Open API Specifications for your CAP service.
Implementing the translation from OpenAPI to TypeScript (TS)
22. Move up to main project root with command cd .. and init a sekeleton package.json with the following command:
npm init -y
23. Enhance the generated package.json with the commands pretransferapidef and transferapidef, like shown below:
{
  "name": "bog__catcat_catgatalog_example",
  "version": "1.0.0",
  "scripts": {
    "test": "echo \"Error: no test specified\" && exit 1",
    "pretransferapidef": "npm --prefix ./CAPService run genopenapi",
    "transferapidef": "npm run pretransferapidef && npx openapi-typescript"
  },
  "keywords": [],
  "author": "",
  "license": "ISC",
  "description": ""
}
24. The package openapi-typescript requires a configuration. It can work with redocly.yaml standard. Thats why we create a redocly.yaml in the main project root folder for handling the OpenAPI => TypeScript conversion process:
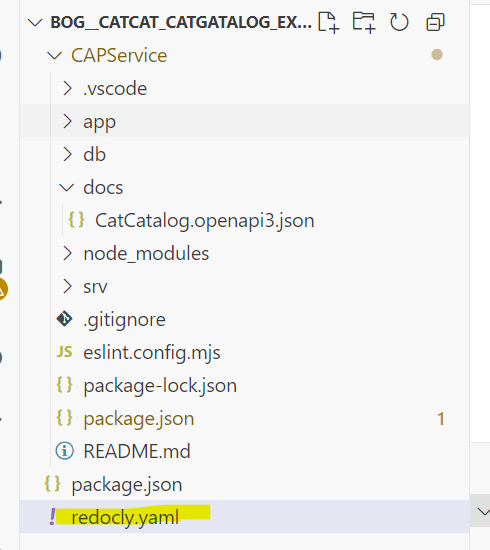
25. For our example, configure it like the following:
apis:
  CatCatalog@v1:
    root: ./CAPService/docs/CatCatalog.openapi3.json
    x-openapi-ts:
      output: ./HTML5Module/src/generated/CatCatalog.d.ts
26. That's all! We can now run the command to test our workflow:
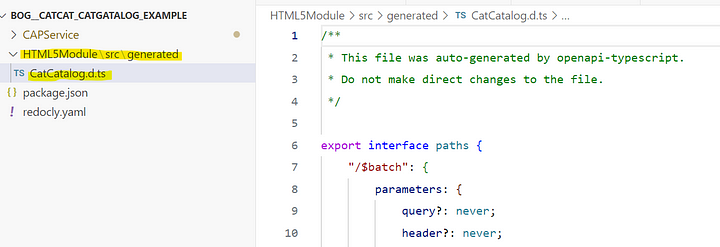
npm run transferapidef
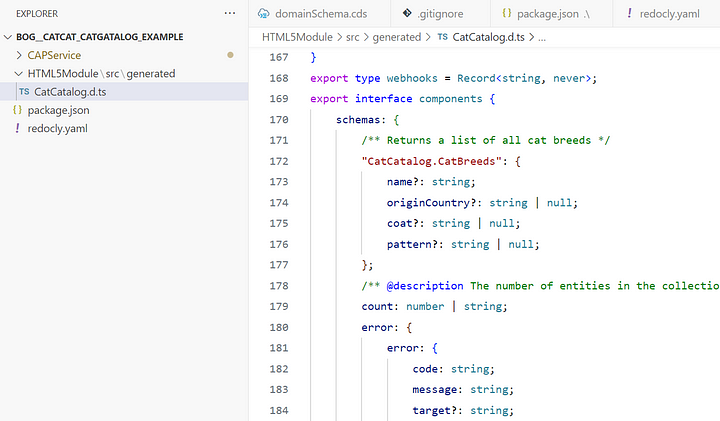
Success! The TypeScript definition has been created in our folder HTML5Module\src\generated! It's working.
We're now done with implementing the back-end and providing the base for consumption. The next step will solely consist of connecting our front-end to the service.
3. Building - front-end
As you might have noticed, I am focusing on Vue.js. That choice has two sides: First, it is my personal preference - you could use any TypeScript-based framework instead. Second, Vue.js seems to be popular amongst the SAP CAP team themself - they offer resources on how to work with it. They also seem to have more resources on Vue.js than Angular or React.
Initializing a Vue.js project
27. Delete the whole HTML5Module directory, including the file we just generated. Now, it's time to initialize the Vuejs project. It will be named HTML5Module. Use this command
npm create vue@latest
28. Work through the setup wizard. Choose the following settings:
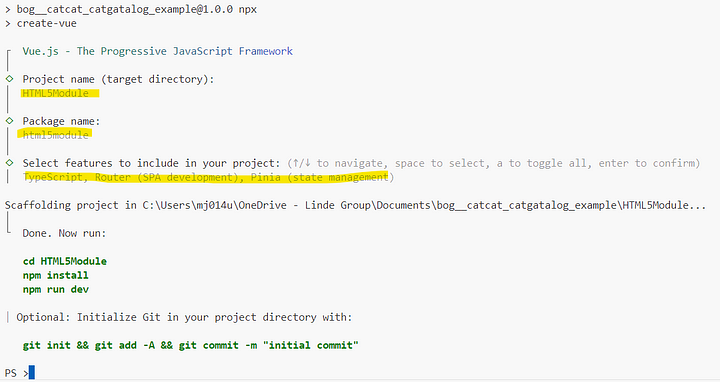
29. Initialize the project and start the local development server with the following commands:
cd ./HTML5Module
npm install
npm run dev
30. It's running! You can now see a basic vue boilerplate app in your browser.

31. Let's transfer our API TypeScript definition again. Run the following command in the project root:
npm run transferapidef
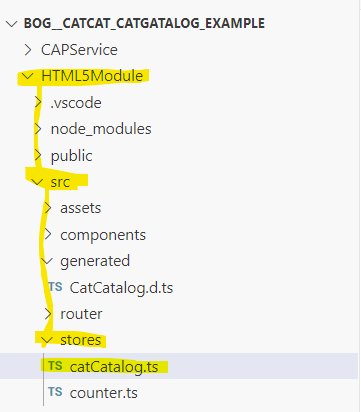
Under /HTML5Module/src/generated, you can now find our created API definition.

32. Finally, we can perform the final step and connect our front-end to the back-end. We previously installed Pinia, which is handling our state. State is organized in different stores. For that, we create a new file catCatalog.ts under /HTML5Module/src/stores.
33. Pinia stores follow a certain pattern. To simplify things, paste the provided boilerplate into catCatalog.ts:
import { defineStore } from 'pinia';
import { ref } from 'vue';

//placeholder type & client import

export const useCatCatalog = defineStore('catCatalog', () => {

    const catBreeds = ref<PLACEHOLDER[] | null>(null);

    /**
     * @description Fetches all cat breeds from the remote sorce
     */
    async function fetchCatBreeds(): Promise<boolean | Error> {

        try {
            //placeholder api call
        } catch (err: unknown) {
        }
      }

    return {
        catBreeds,
        fetchCatBreeds
    }
});
34. We will now import our type definitions from our generated file:
import { defineStore } from 'pinia';
import { ref } from 'vue';

//ype & client import
import type { components } from "../generated/CatCatalog";
type CatBreed = components['schemas']['CatCatalog.CatBreeds'];

export const useCatCatalog = defineStore('catCatalog', () => {

    const catBreeds = ref<CatBreed[] | null>(null);

    /**
     * @description Fetches all cat breeds from the remote sorce
     */
    async function fetchCatBreeds(): Promise<boolean | Error> {

        try {
            //placeholder api call
        } catch (err: unknown) {
        }
      }

    return {
        catBreeds,
        fetchCatBreeds
    }
});
35. Next, we install a client. I decided for openapi-fetch. There is multiple libraries that could be chosen instead. Install library with this command:
npm install openapi-fetch --save-dev
36. Now, we initialize the client in our Pinia store. It's done like this:
import { defineStore } from 'pinia';
import { ref } from 'vue';

//ype & client import
import createClient from "openapi-fetch";
import type { components } from "../generated/CatCatalog";
import type { paths } from "../generated/CatCatalog";
type CatBreeds = components['schemas']['CatCatalog.CatBreeds'];

const apiclient = createClient<paths>({ baseUrl: "http://localhost:4004/odata/v4/cat-catalog" });

export const useCatCatalog = defineStore('catCatalog', () => {

    const catBreeds = ref<CatBreeds[] | null>(null);

    /**
     * @description Fetches all cat breeds from the remote sorce
     */
    async function fetchCatBreeds(): Promise<boolean | Error> {

        try {
            //placeholder api call
        } catch (err: unknown) {
        }
      }

    return {
        catBreeds,
        fetchCatBreeds
    }
});
37. The last pending thing it implementing the API call. We can now just use our client, call the endpoint and map the data directly. Beautiful:
import { defineStore } from 'pinia';
import { ref } from 'vue';

//ype & client import
import createClient from "openapi-fetch";
import type { components } from "../generated/CatCatalog";
import type { paths } from "../generated/CatCatalog";
type CatBreeds = components['schemas']['CatCatalog.CatBreeds'];

const apiclient = createClient<paths>({ baseUrl: "http://localhost:4004/odata/v4/cat-catalog" });

export const useCatCatalog = defineStore('catCatalog', () => {

    const catBreeds = ref<CatBreeds[] | null>(null);

    /**
     * @description Fetches all cat breeds from the remote sorce
     */
    async function fetchCatBreeds(): Promise<boolean | Error> {

        try {
            // api call
            const {response, data} = await apiclient.GET('/CatBreeds');

            if (!response.ok) throw new Error('Malformed response by mode endpoint');
            if (!data) throw new Error('Failed to fetch mode details / malformed data');

            data.value != undefined ? catBreeds.value = data.value : null;

            return true;
        } catch (err: any) {
            return new Error(err)
        }
      }

    return {
        catBreeds,
        fetchCatBreeds
    }
});
Done! We now created the back-end connection. You already see - it's very straightforward and easy to implement.
38. The last setup is to call our store and display the data in the UI. For keeping things simple, we just exchange the whole App.vue under /HTML5Module/src/App.vue with very simple code:
<template>
  <div>
    <table>
      <tr>
        <th>Name</th>
        <th>Origin Country</th>
        <th>Coat</th>
        <th>Pattern</th>
      </tr>
      <tr v-for="catBreed in catCatalogStore.catBreeds" :key="catBreed.name">
        <td>{{ catBreed.name }}</td>
        <td>{{ catBreed.originCountry }}</td>
        <td>{{ catBreed.coat }}</td>
        <td>{{ catBreed.pattern }}</td>
      </tr>

    </table>
  </div>
</template>

<script setup lang="ts">
import { onMounted } from 'vue';

import { useCatCatalog } from '@/stores/catCatalog'

const catCatalogStore = useCatCatalog()

onMounted(() => {
  catCatalogStore.fetchCatBreeds();
})

</script>
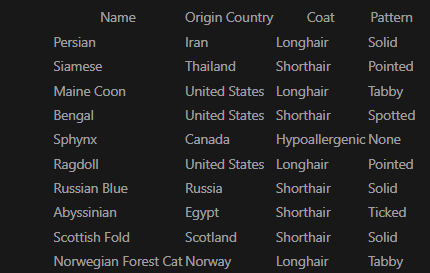
Done! Our app is basically ready. After a reload of our front-end view, you can see that the values are being pulled from the back-end:
4. Completion - Seeing it in action!
We have a connection between our back-end and front-end in place now. You can navigate to http://localhost:5173/ to see it in action. That means, we finished our objective. It's time for a retrospective.
5. Conclusion & Retrospective

Honestly, building a full-stack app with SAP CAP on the backend and Vue.js 3 on the frontend is easy. It's developer-friendly and packed with features that make backend development a breeze.
Advantages of this setup
Pairing it with Vue.js made the front-end side more fun, especially with how easy it is to pull in the TypeScript definitions for the API.
- We can locally develop our application End-To-End, without an online connection being required.
- By using a monorepo, we can align versioning. Removing
./src/generatedfrom versioning allows us to generate it during the build process, ensuring our Vue app's implementation code is type-checked against the current API definition - eliminating dead endpoints. We can also deploy both components at the same time. - Authentication & authorization can be handled by an proxy in front and forward auth tokens to the back-end. SAP AppRouter is a perfect example. No unnecessary code in your back-end!
Disadvantages of this setup
Of course, there were a few hiccups. Deploying CAP outside of SAP's cloud isn't super intuitive. It'd be nice if SAP worked on making their framework a little more open and easier to use outside the BTP bubble.
Final conclusion
The whole experience feels good and everything works together smoothly. I'd definitely recommend this combination for anyone interested in building modern apps, especially if you're looking to experiment with enterprise-grade frameworks without losing control of your code.
GitHub Repository
The whole code used & created within this blog post is available on GitHub: Open repository blog-capjs-catcatalog by martinjurran on github.com
Feel free to submit issues in case of questions! :)
Lessons Learned
I have used the technology to build a production app that I will release later. Things I learned while building something big:
- CORS Implementation is incomplete; SAP CAP doesn't return allowed Methods by default. Custom Implementation needed. Important for production.
- X-CSRF is required by SAP CAP default but not implemented in openapi-fetch; Either "missing out on security" (bad idea) or a custom implementation on client side is required.
- Conceptual Data Model influences service definitions; unlike stated by SAP CAP team, you're not free from constraints when modeling the service endpoints. Things like flattening out arrays of objects, etc. are not completely implemented.
- Deploying SAP CAP outside of BTP is not documented straightforwardly; Connecting the PostgreSQL database presented challenges due to a incomplete documentation at this time.
- Deploying SAP CAP outside of BTP is not documented straightforwardly; How to build it for deployment within custom environments (e.g. bare vps, docker, ..) is not fully described.
- Service definitions in SAP BTP (MTA.yaml) are challenging; If you don't have access to SAP's graphical configuration tools and/or insufficient permissions to systems.
- Using complicated data types, especially geo references, presents challenges; Especially if database extensions like PostGIS are involved, there is a lot of custom code to be written.
Comments