How to read *.csv files directly in PowerApps
Comprehensive guide on how to read and process *.csv-files directly in PowerApps with Power Automate

Enterprise users frequently request mass data import features for their Power Apps. While there are various data exchange formats, *.csv files remain one of the most popular, especially due to their ease of use. However, if you’ve worked with Power Apps, you will know that there is no out-of-the-box solution for loading/importing *.csv files. This can leave Power Platform Architects with quite a headache.
There is a simple solution: Power Apps and Power Automate can easily read *.csv-files together, providing a simple way to mass import data. They are in one ecosystem and collaborate nicely.
The following step-by-step guide will walk you through how to load *.csv files in Power Apps using Power Automate. Let’s get started.
Concept
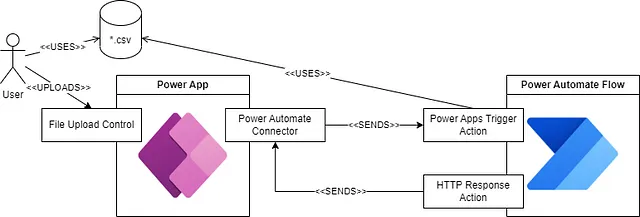
Before we start implementing, it’s always good to take a look at the rough concept.
Power Automate flows can be triggered by Power Apps — there are various ways, including user actions. The Power Automate trigger also allows for handing over properties — such as files. Finally, the trigger supports reading an HTTP response sent back by the Power Automate flow.
That being said, we can break down what we need to do into these steps:
- Create a flow with the Power Apps trigger
- Hand over the file from Power Apps to Power Automate
- Process the file in Power Automate
- Send a response back to the Power App
- Process the response and load the data to use it directly in the Power App
Now as we know what to do in theory, let’s dive right into the step-by-step guide.
Solution
Table of Contents
- Creating the Power Automate Flow
- Configuring the Trigger
- Initialize Global Variables
- Determine CSV Separator
- Determine CSV Header
- Iterate through the *.csv file in parallel
- Building the JSON response
- Add Power Automate to Power App
- Power Automate as data source in Power Apps
- File input in Power Apps
- Sending the *.csv-file from Power Apps to Power Automate
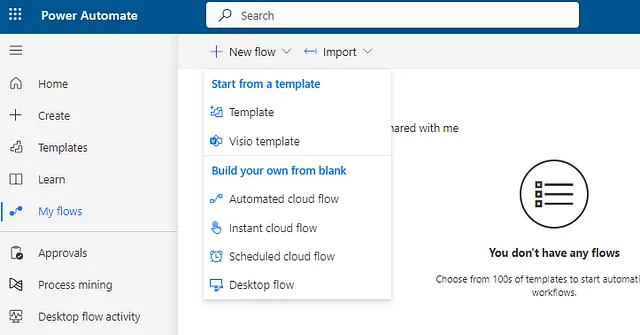
1. Creating the Power Automate Flow
1.1 Open the Power Automate dashboard, click on + New flow and select Instant cloud flow
1.2. Select the instant cloud flow trigger called When Power Apps calls a flow (V2), click on the big blue Create button.
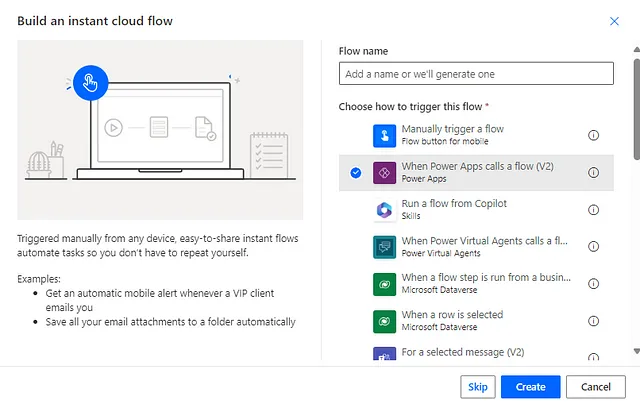
After successful creation, you will be redirected to the Power Automate Designer.
2. Configuring the Trigger
2.1. You are now in the Power Automate designer. Click on our input action When Power Apps calls a flow (V2) and navigate to the Parameter tab.

2.2. Click on Add an input and add an input of type File.

2.3. Assign a speaking name to the parameter, such as InputFile. Assign an easy-to-understand description. As we load *.csv-files, I decided for “Please select *.csv file”. The values picked here will reflect in our Power App.

2.4. Close the popup and go back to our flow view. Click the + Circle below the trigger, then click Add an action.

The initial setup of our flow is completed now. Let’s continue with creating some global variables.
3. Initialize Global Variables
3.1. To initialize a variable, we need an action of type Initialize Variable. Assign a good name, I chose CSV_CONTENTS. Set the type to String and the value to InputFile contentBytes.

The format provided by the When Power Apps calls a flow (V2) trigger is not the best to work with. It needs to be modified to be processable later.
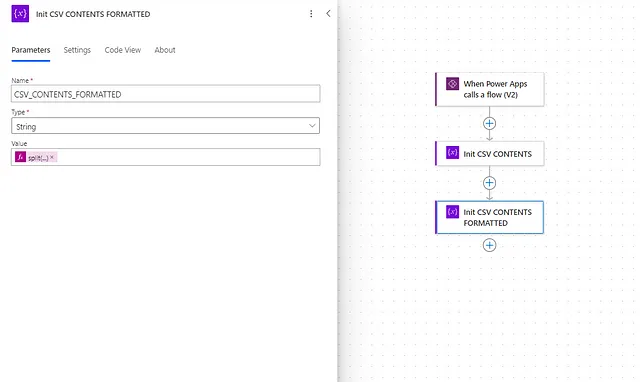
3.2. Create another action of type Initialize Variable to format the output. I named it CSV_CONTENTS_FORMATTED, type String. The initial value is:
split(Variables('CSV_CONTENTS'),'')[0]
When set up, the action should look like this:
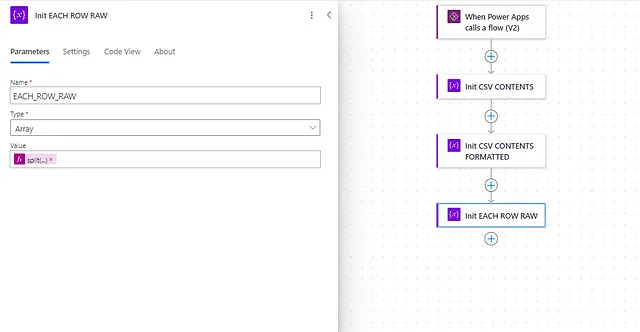
3.3. Initialize another variable which is used for storing each csv row. I named it EACH_ROW_RAW, type array. Set the value to:
split(encodeUriComponent(variables('CSV_CONTENTS_FORMATTED')),'%0D%0A')
When set up, the action should look like this:
3.4. Create more actions of type Initialize Variable. We need these variables available:
- HEADER_LINE: Type:String / Value:Empty
- HEADERS: Type:Array / Value:Empty
- CSV_SEPARATOR: Type:String / Value: Empty
- JSON_STRING: Type:String / Value:Empty
- JSON_STRING_LOG: Type:String/ Value:Empty

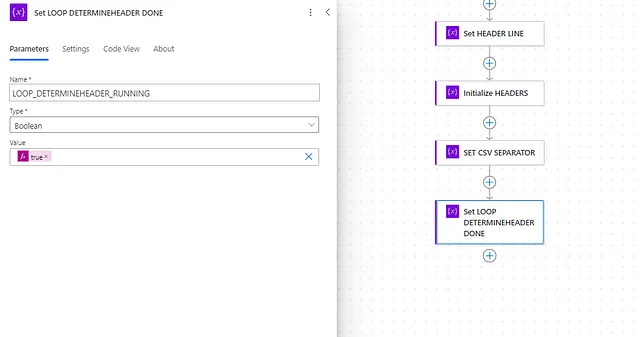
3.5. Create the last action of type Initialize Variable and name it LOOP_DETERMINEHEADER_RUNNING, type Boolean with default Value=true
Now, we finished initializing all the required variables and can continue with the actual implementation.
4. Determine CSV Seperator
The scope establishes the boundaries within which actions and variables can be accessed and controlled. Here’s why scope is important in Power Automate: Encapsulation: Scope allows you to group related actions and variables together, making it easier to understand and maintain the workflow. (Process Street, How to Use Scope in Power Automate (process.st))
4.1. First, we create a scope to group our first complicated implementation and assign a speaking name.
4.2. Instead of using variables like before, we will now use the Compose Action. We first create a Compose Action for counting characters of type semicolon in our CSV_CONTENTS:
length(split(variables('CSV_CONTENTS'), ';'))
When set up, the action should look like this:

4.3. Now, we set up the same for counting comma:
length(split(variables('CSV_CONTENTS'), ','))
When set up, the action should look like this:

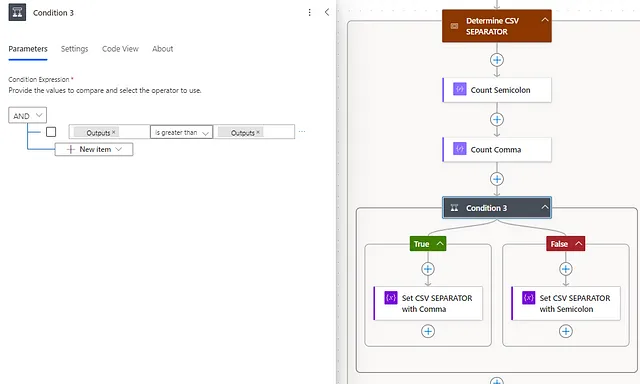
4.4. Now, we calculated the count of commas and semicolons. We would now like to find out if the file is separated by comma or a semicolon.
We just compare the two counts, and the highest value is most likely to be the dominant separator.
This approach works in most cases but is not the best solution. Especially if the dataset can contain a lot of comma/semicolon itself. For the matter of keeping things simple, I continue with this approach.
Now we determined the separator used by our *.csv file. We can continue with determining the header.
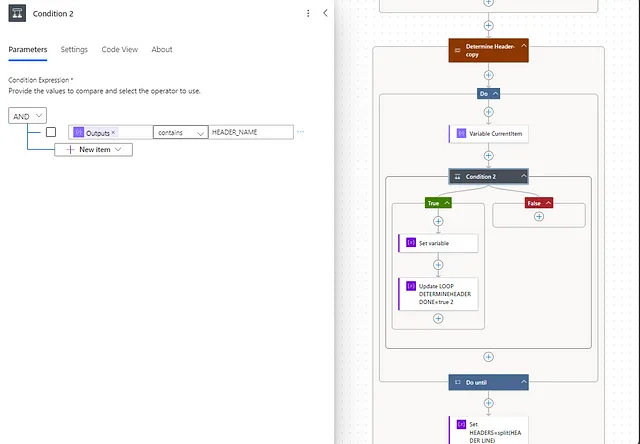
5. Determine CSV Header
For determining the header, we need to loop through our dataset. We assume, that the *.csv-file that is to be loaded is standardized.
5.1. We use a condition action to check if a line contains a specific header field. If it does, it’s our header.
This approach works in most cases but is not the best solution. Especially if the dataset can contain a data set that also contains the header name. For the matter of keeping things simple, I continue with this approach.
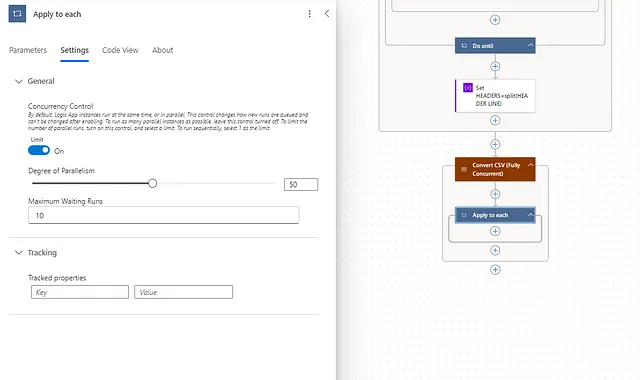
6. Iterate through the *.csv file in parallel
The probably most important constraint for our solution is time — processing a *.csv-file line by line consecutively can take a lot of it.
That’s where we can make use of parallelism in Power Automate, called concurrency. Each line of the *.csv-file will be worked on in parallel — pushed into an array variable as soon as processing finishes.
That means, we will not be able to maintain the *.csv-files in original order. But, that is usually not important, as there should be identification fields in the *.csv-file depicting the correct order.
6.1. Create a scope and assign a speaking name

6.2. Create an Apply to each loop. As the source we use EACH_ROW_RAW.

6.3. Within the Apply to each action settings, we enable Concurrency Control with Degree of Parallelism=50.
6.4. Create a Compose action to decode the line value, with this code:
decodeUriComponent(items('Apply_to_each'))
When set up, the action should look like this:

6.5. Create a new Compose action that splits the csv line with the separator determined earlier. Use this code:
split(outputs('Compose_EACH_ROW'), variables('CSV_SEPARATOR'))
When set up, the action should look like this:

6.6. Validate the data set against the headers we extracted earlier. For the check, we compare if the length of the line element array:
length(outputs('Array_with_each_element_in_the_CSV_line'))
is equal to:
length(variables('HEADERS'))
That way we ensure compliance of individual datasets with the headers read before.

6.7. If the condition is false, we append a string to our error log. We use the Append To String Variable Action

6.8. Parse the individual column values. To ease things, we hard-code the headers to their column indexes. We use a compose action to determine a column value based on its index:
replace(outputs('Array_with_each_element_in_the_CSV_line')[0],'"','')
When set up, the action should look like this:

6.9. Build the JSON String manually in a Compose action.
concat('"', variables('HEADERS')[0], '":"',outputs('Compose_COL_0'),'"')
When set up, the action should look like this:

6.10. Append the JSON String to our result string variable JSON_STRING. Be aware that we add curly brackets and comma to separate the data sets manually.
Now we are done with reading the individual lines and adding them to a JSON array within a string type Variable. We can now start building the response.
7. Building the JSON reponse
7.1. We initialize a variable called RESULT. There, we define our response format:

- json:
replace(variables('JSON_STRING'),'""','"')
- messages:
replace(variables('JSON_STRING_LOG'),'""','"')
7.2. Create a Response action. That one will allow us to access the flow results directly in Power Apps. Status code should be 200, body will be:
replace(variables('RESULT'),',]',']')
When set up, the action should look like this:

We now completed the set up of our Power Automate flow — the next step is to prepare our Power App for calling the flow and working with the results.
8. Add Power Automate to Power App

9. File input in Power Apps
Acquiring a file input control in Power Apps is not trivial — per default, there is none. There is a workaround to use out-of-the-box file input in Power Apps.
9.1. Create a dummy SharePoint list which allows attachments. If you don’t know how, follow this guide:
How to create SharePoint List - Beyond Intranet
9.2. Connect the dummy SharePoint list to your Power App. If you don’t know how, follow this guide:
How to Connect SharePoint with Power Apps - TechEfficiencySolution
9.3. Create a Form in Power Apps with the dummy SharePoint list as data source
9.4. Take a look at the newly created form and locate the attachment input

9.5. Cut out the Attachment input and delete the Form from the Power App.

Now, we have an input available which we can use to upload a single file.
10. Sending file from Power Apps to Power Automate
10.1. Insert a Button into your Power App. We will use the button to trigger the Power Automate Flow.
10.2.
Set(LCL_FILESATTACHED, Last(Attachment_1.Attachments));


Set(LCL_FILELOADRESULT_RAW,TESTREADCSV.Run({
    file: {
        contentBytes: LCL_FILESATTACHED.Value,
        name: LCL_FILESATTACHED.Name
    }
}));
Now, you have connected the Power Automate Flow to your PowerApp. If you did everything right, you can use the output types defined in your Flow right away in your Power App! It works like a standard Colection.
CountRows(LCL_FILELOADRESULT_RAW.json)
Conclusion
It’s very much possible to provide your Power App’s users with a *.csv import functionality right inside your application. That said, Power Apps does not offer functionalities out-of-the-box, and some requirements require quite unusual approaches.
I personally hope that such a functionality will be added to Power Apps natively. Until then, the way described in this article is the best we have.
Comments